")
")

In this tutorial, you'll learn how to create forms with the Formmailer.
It's a simple way to set up a secure contact form or feedback form, illustrated with a few examples.
What is a form mailer?
Imagine you want to organize an event that guests can sign up for online.
Now wouldn't it be nice if you could configure all of the details that the guests need to provide, such as the name, the number of attendees and whether they are bringing anything along?
The form mailer lets you easily create these types of forms without requiring any in-depth programming knowledge.
We explain how in the following.
How do i get started?
To begin with, you should consider what information you want to send using the form.
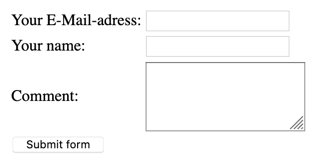
First, create a simple form.
Make sure that the "form action" points to /cgi-sys/FormMail.cgi.
This form looks like this:
The E-Mail that you receive might look like this:
FROM: Hans Muster <
TO: Info <
SUBJECT: Submit form
recipient:
comment: Please send me additional informations about your services.
Basic parameters for the form mailer
Parameters on the website or in a file
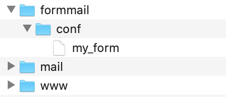
You can create the parameters with the hidden fields, i.e. the fields that are invisible on the form, or you can create a configuration file. This is helpful, for example, if you do not want your E-Mail address to be shown on the form.
To do this, create a "formmail" folder in your FTP directory and then a "conf" folder inside this folder. The folders must have exactly these names. Now create a file called "my_form", for example, in the folders. In your FTP client, you should then see something like this:
You can then use the following option to integrate this file into your form:
The file is row-based and has the following format: [fieldname]:[value]
All characters, including spaces and tabs, can be used for the value.
This file could contain the following:
Which E-Mail addresses do I want to send my form to?
You can send forms directly to an E-Mail address along with a copy or blind copy to other E-Mail addresses. These addresses must also belong to your account.
Multiple E-Mail addresses can be separated using commas.
Recipient E-Mail address (To:)
This email address is being protected from spambots. You need JavaScript enabled to view it.
-->Carbon copy E-Mail address (Cc:)
This email address is being protected from spambots. You need JavaScript enabled to view it.
-->Blind copy E-Mail address (Bcc:)
This email address is being protected from spambots. You need JavaScript enabled to view it.
-->Other important E-Mail settings
Confirmation E-Mail
Unfortunately, this function had to be removed due to abuse by spammers.
Subject
You can pre-fill the subject or leave it as user-definable.
If you want to leave it up to the user, make the field visible. Otherwise, leave it invisible.
Name of the person filling out the form
The E-Mail address of the person filling out the form must be entered in the "email" field. It will then appear in the header of the E-Mail.
E-Mail address of the person filling out the form and SPF
Provide E-Mail address of the person filling out the form as text content; set own address as the sender
In the first scenario, the E-Mail address of the person filling out the form is set as the sender of the E-Mail. This can cause problems right away, such as if there are mistakes in the E-Mail addresses. Technologies such as SPF sometimes also prevent the form owner from receiving the E-Mail.
Change the sender
Set the "email" value to an existing E-Mail address belonging to your hosting account. This ensures that you will always receive the E-Mail.
The E-Mail address of the person filling out the form is then included as plain text content.
Charset
The default character set for the form mailer is ISO-8859-1.
If your page uses a different character set, you must configure this in the form mailer so that the data contained in the E-Mail is displayed correctly.
Use the "charset" field for this:
Sorting fields in E-Mails
You can sort the form fields either alphabetically or in a certain order.
If you do not sort the fields, they will be displayed randomly and not in the same way that they are listed on your webpage.
The only way to sort the E-Mails in the order they appear on the webpage is by using the "sort" field.
Sorting in alphabetical order
Sorting individually
In the E-Mail, first the order and then the name are shown.
If there are other fields, these are included below.
Success and error pages
You can create a separate page that appears automatically when a form has been submitted successfully or when an error occurs.
The error page shows the problematic fields as GET parameters, which you can then read with a programming language.
Success page
Error page
Advanced parameters for the form mailer
You are, of course, free to make further configurations to your form.
The visitor can attach a file to the form
The visitor can send you files.
This requires you to first configure the form to support files. Add the option enctype="multipart/form-data":
Each field that supports file attachments must begin with file_ and be of the type "File".
IP address or browser information
You can also collect what are known as environment variables, i.e. information about the visitor's environment.
Examples include the IP address, the name of the browser and the hostname of the visitor's computer.
Environment variables
- REMOTE_HOST
- Returns the hostname of the visitor's computer
- REMOTE_ADDR
- Returns the visitor's IP address.
- HTTP_USER_AGENT
- Returns the name of the user's browser and operating system.
What should appear in the E-Mail?
By default, all E-Mail fields are sent. You can hide certain fields, however.
Hide fields
Here, "redirect", "sort", "missing_field_redirect" and "bcc_mail" are not shown in the E-Mail:
Checking form input
You can easily check forms for the presence of variables or check them using a regular expression.
Required fields
You can choose this setting, for example, when completing the address fields of a form is mandatory.
Checking with a regular expression
You can add a regular expression with [field]_regex.
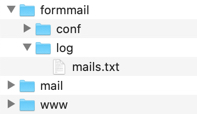
Logging
Logfile
You can also have the messages that are sent to you saved in a file.
The log is saved in the formmail/log folder in the same directory where "public_html" or "www" are located.
The logfile parameter lets you select the particular log file.
You then define the file as the log file as shown here:
Templates
You can customize the appearance of the E-Mails you receive.
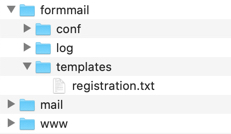
Creating templates
You can configure exactly how the E-Mails you receive will be displayed.
To do this, create a file in the formmail/templates folder located in the root FTP directory. You can name the file however you like. Let's name the template "registration.txt".
You can then enter the E-Mail display parameters in this file. The names in brackets here are placeholders for the actual field content.
Example
The content of the registration.txt file might look something like this:
An E-Mail sent with the customer's data might therefore looke like this:
Last name: Doe
First name: John
Street address: Sample Street 1
ZIP/City: 1234 Sample city
Comment:
I'm coming with my wife and bring a cake.
Using templates
You can now use any template for E-Mails that are sent to you.
Template for the E-Mail you will receive
Layout of the success and error pages
You can make some changes to the layout of the success and error pages even without a separate HTML page. These options are only relevant if you do not create your own success or error page.
Background
Background image for success and error pages
Background color of the success and error pages
Background image for the success page
Background color of success page
Background image for error page
Background color for error page
Title
The title for the success and error page can be set as follows:
Title of success page
Title of error page
Special information for the error page
If the form mailer generates the error page, the fields are displayed as follows:
[field]:
[value]
For example:
email:
The colors in "[field]" can be changed with the parameter error_key_color, und those in "[value]" with error_value_color:
Color of "[field]"
Background color for error page
Examples
How a form might look:
Form for a party registration
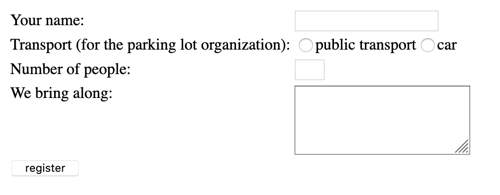
The Code looks like this:
The E-Mail that you receive might then look like this:
bring: carrot cake
persons: 5
realname: Hans Muster
transport: car
Form with checking
You want to create a form for a course registration and check the variables.
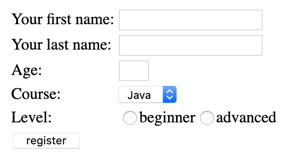
On this form, the last name, first name as well as a course and level must be specified. The age must consist of exactly two numbers.
The code looks like this:
For support requests please use this form instead.