")
")

Have you created an e-mail address in the Hostpoint Control Panel and now want to use it in Thunderbird? We’ll show you how in this article – one step at a time.
Thunderbird is a free and easy-to-use e-mail program. It can be used with Windows, macOS and various Unix operating systems. Thunderbird offers many features that make sending e-mails every day a pleasant experience.
Downloading Thunderbird
You can download Thunderbird free of charge from the following link in various languages for Windows, macOS and Unix: https://www.thunderbird.net/
Automatic configuration
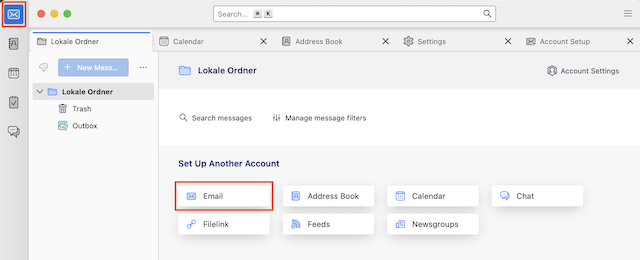
- Open Thunderbird and click “Email” under “Set Up Another Account” on the start page of the e-mail area.
→ This will start the e-mail account setup wizard. - Enter your full name, e-mail address and the corresponding password and click “Continue”.
Note: The name will be displayed as a sender to the recipients of your e-mails.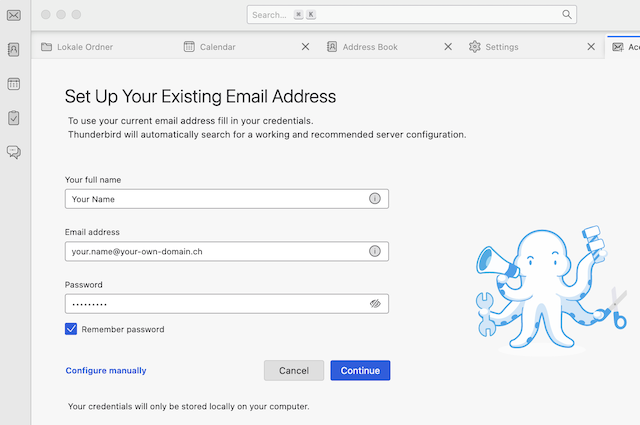
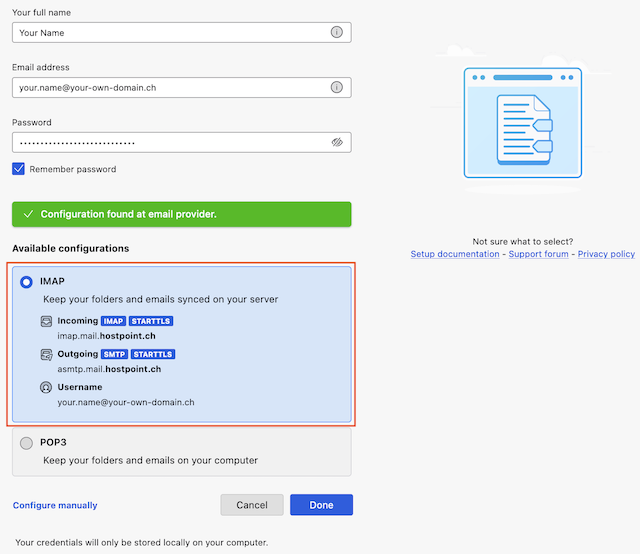
→ Thunderbird usually recognizes the server settings by itself. - Now select either an IMAP or POP3 account:
- IMAP: With this option, your e-mails are stored on the server. Each time you read an e-mail, a copy is downloaded from the server.
- POP3: With this option, your e-mails are downloaded to and saved on your smartphone. The messages are then deleted from the server. This allows you to read your e-mails at any time, even if you are not connected to the internet.
Please note: The automatically detected server settings are not always correct. Therefore, it is important to check that the settings correspond to the following information:
- Incoming mail server: imap.mail.hostpoint.ch or pop.mail.hostpoint.ch
- Outgoing mail server: asmtp.mail.hostpoint.ch
- Username: Your e-mail address
- If all the information is correct, click “Done” to complete the account setup.
Manual configuration
- If any information is incorrect during the automatic configuration, click “Configure manually” and correct the information. Details about the e-mail settings can be found in this article.
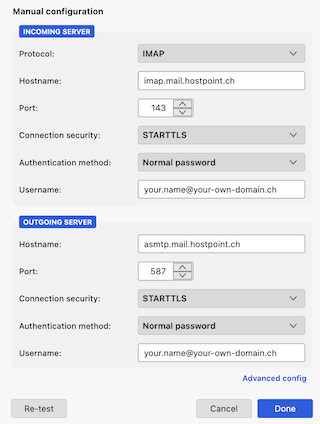
- Next, click “Re-test”. If Thunderbird has successfully checked the information, a success message will appear.
- Click “Done” to complete the account setup.
Check account settings
If you want to review or change your account settings after setup, you can do so under “Account settings” > “Server settings” / “Outgoing mail server (SMTP)”.
For support requests please use this form instead.