")
")

Django is a Python-based framework for developing web applications.
We offer you the latest Python versions for your Managed Flex Server. We regularly update these versions.
These instructions describe how to set up and operate a Django application on your Managed Flex Server.
Requirements
To set up and run a Django application, you need at least a Managed Flex Server M.
Building a Django application
This guide explains how to create a simple “Hello World” application that returns a simple text in response to HTTP requests.
We recommend that you create an ~/app/ folder for your applications and then subsequently keep a separate subfolder for all of your applications. This ensures that your applications are organized and easily accessible. We will therefore create the folder ~/app/helloworld for the Django application and move into this folder:
mkdir -p ~/app/helloworld
cd ~/app/helloworld
In the newly created ~/app/helloworld application folder you can now create the required structure for your application. In this example, we are setting up a simple Django project:
python3 -m venv venv
source venv/bin/activate
pip install django gunicorn
django-admin startproject helloworld .
We recommend that you install your Python projects in their own, discrete virtual environments. In this example, this is done using "python3 -m venv venv && source venv/bin/activate".
In this example, a simple text string is returned in response to HTTP requests. To do this, edit the file ~/app/helloworld/helloworld/urls.py as follows:
from django.contrib import admin
from django.urls import path
from django.http import HttpResponse

urlpatterns = [
    path('', lambda r: HttpResponse('Hello World')),
    path('admin/', admin.site.urls),
]
In the Django settings, the ALLOWED_HOSTS variable also needs to be modified. For the sake of simplicity, access is allowed from all domains:
sed -i "" "s/ALLOWED_HOSTS =.*/ALLOWED_HOSTS = ['*']/" ~/app/helloworld/helloworld/settings.pyIntegration
Using Custom Service Control
The Custom Service Control (CSC) can handle operations and the automatic management of your application, e.g. starting and stopping it when performing maintenance on your server.
It is extremely easy to configure the Django helloworld app in the CSC. To do this, create a new custom service for the Django application.
hpservices supervisord add helloworldThis creates a configuration framework for the new service in the file ~/.services/supervisord/helloworld/service.conf. Only the command needs to be modified for the Django application; all other suggested values can be accepted (remove semicolon at the beginning of the line).
[program:django]
command=%(ENV_HOME)s/app/helloworld/venv/bin/gunicorn helloworld.wsgi -b 127.0.0.1:8080 ; the program (can take args)
directory=%(ENV_HOME)s/app/helloworld/       ; directory to cwd to before exec (default no cwd)
autostart=true                ; start application at supervisord start (default: true)
stopwaitsecs=10               ; max num secs to wait before SIGKILL (default 10)
stdout_logfile=%(ENV_HOME)s/.services/supervisord/helloworld/log/default.log
stdout_logfile_maxbytes=1MB   ; filesize at which to rotate logfiles (default ist 50MB)
stdout_logfile_backups=10     ; number of stdout logfile backups (0 means none, default 10)
stderr_logfile=%(ENV_HOME)s/.services/supervisord/helloworld/log/default.err
stderr_logfile_maxbytes=1MB   ; filesize at which to rotate logfiles (default is 50MB)
stderr_logfile_backups=10     ; number of stderr logfile backups (0 means none, default 10)
You can activate the new configuration for your Django application using supervisorctl update:
supervisorctl update
helloworld: added process group
Attention: If you receive an error, you must uniquely execute before "hpservices supervisord start".
For more detailed information on working with CSC and the options it offers, refer to the guide for Custom Service Control.
Web server configuration
If you now want to make your application accessible via HTTP(S), you must configure your website in the Hostpoint Control Panel so that the web server will route requests to your application via proxy.
In your Hostpoint Control Panel, create a website of the type “Nginx proxy for own application”:
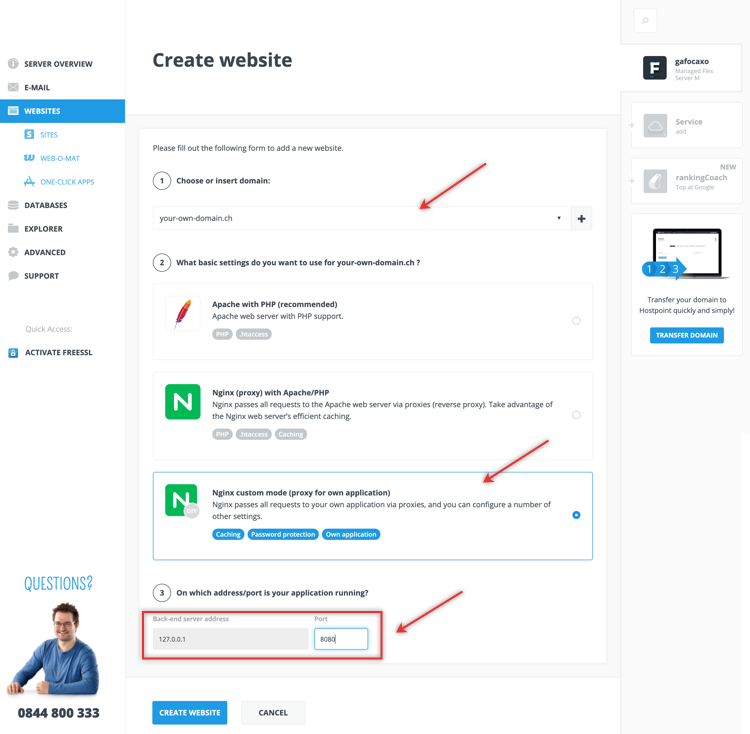
- Server address and port
- The proxy function expects your application to be listening on the IPv4 loopback address 127.0.0.1, so you only need to enter the port: 8080.
For support requests please use this form instead.