



Info: Note: This article describes how to set up a redirect for your domain to another domain (e.g. from “your-own-domain.ch” to “your-new-domain.ch”). If you want to redirect your domain from HTTP to HTTPS, follow the instructions in this article.
In the Hostpoint Control Panel, you have the option to set up a redirect for your domain. This will automatically redirect visitors to the specified website when they enter your domain in the browser.
Redirects can be set up in two ways:
- In the domain management
- In the “.htaccess” file: This option is only available if you have a web hosting account with Hostpoint.
Both options are described below.
Set up redirect in the domain management
- Log in to the Hostpoint Control Panel with your Hostpoint ID.
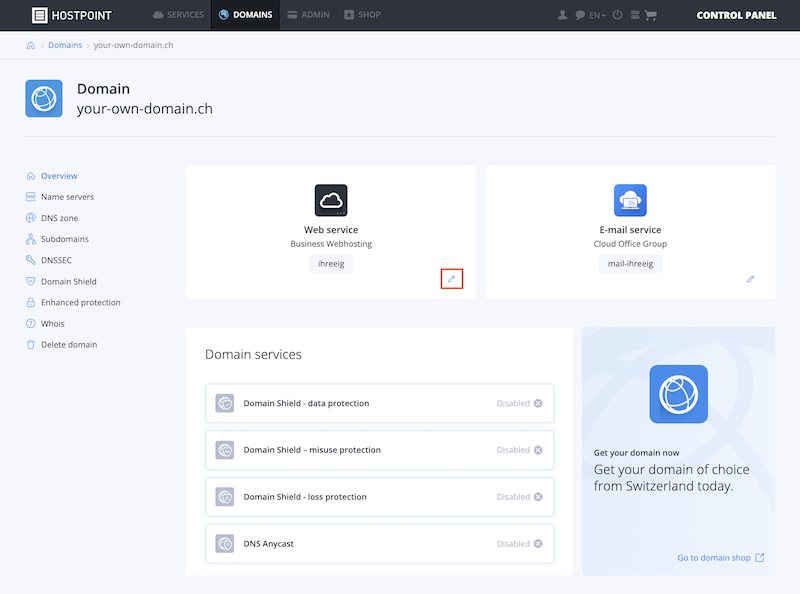
- Click on “Domains” in the menu at the top.
→ You will see an overview of your domains. - Click the desired domain to edit it.

- In the “Web service” section, click the edit icon.
- Under “Domain redirect,” enable the redirect and enter the desired URL.
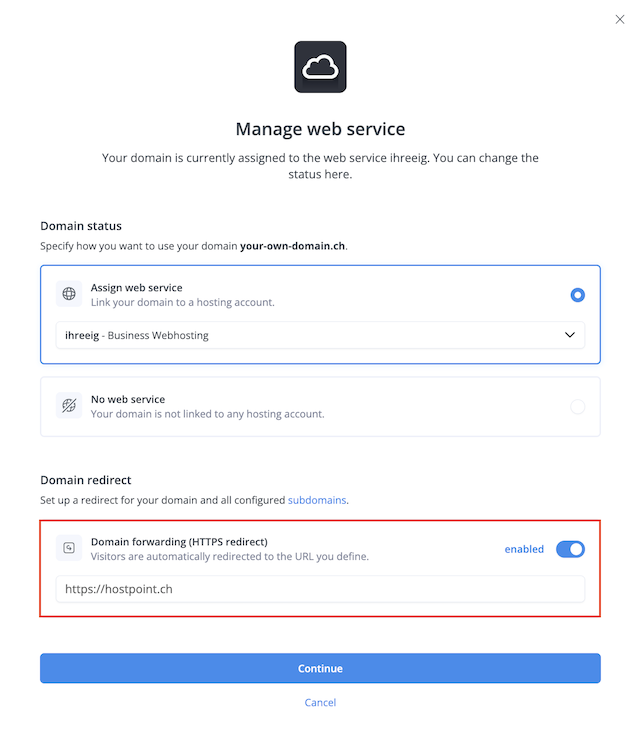
- Save the changes.
→ The domain redirect will be active in about 5 – 10 minutes. All subdomains of this domain configured in the Control Panel will also be redirected, provided the subdomains do not have their own records.
Info: Note: The redirect only works if our name servers are stored with the domain and the domain refers to an IP address with us. Otherwise, you will receive an error message due to an IP address conflict.
Set up redirect in .htaccess
- Log in to the Hostpoint Control Panel with your Hostpoint ID.
- Open the web hosting on which you manage the affected website.
- Click on “Websites” in the menu on the left.
- If no website exists for the domain yet, create one via “Create a website.”
- On the right-hand side of the page, click on the blue link to get to the document root of your website. Then return to the overview.

- Search for a file with the name .htaccess. If a file with this name does not yet exist, create it via “Create file”.

- Edit the file by clicking on the pencil symbol.
- Insert the following code and replace https://your-own-domain/ with the desired target URL:
.htaccess
redirect 301 / https://your-own-domain.ch/ - Save your settings.
→ The redirect has been set up.

Please use this form only to provide feedback on the above guide.
For support requests please use this form instead.
For support requests please use this form instead.

