")
")

Want to synchronize your calendar and address book from Cloud Office with one or more devices? In this article, we’ll show you how.
Calendars and address books from Cloud Office can be synchronized with any device or application that supports CalDAV or CardDAV.
CalDAV stands for Calendar Distributed Authoring and Versioning and is a network protocol for synchronizing calendar data. CardDAV performs the same task for address books and the contact details they contain.
Mac
CalDAV
- Open your system settings.
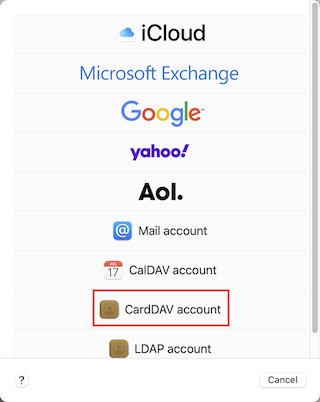
- Click on “Internet Accounts” > “Add Account” > “Other” and then select “CalDAV account.”

- Now enter the following details:
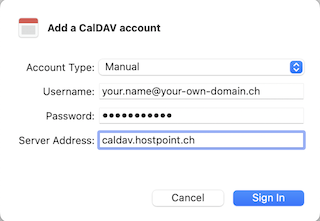
- Account type: Manual
- Username: The same e-mail address that you use to log into Cloud Office, e.g.This email address is being protected from spambots. You need JavaScript enabled to view it.
- Password: Your password
- Server address: caldav.hostpoint.ch - Click on “Log in.”
→ The calendar is synchronized and can be viewed in the Calendar app.
CardDAV
- Open your system settings.
- Click on “Internet Accounts” > “Add Account” > “Other” and then select “CardDAV account.”
- Now enter the following details:

- Account type: Manual
- Username: The same e-mail address that you use to log into Cloud Office, e.g.This email address is being protected from spambots. You need JavaScript enabled to view it.
- Password: Your password
- Server address: carddav.hostpoint.ch - Click on “Log in.”
→ The address book is synchronized and can be viewed in the Contacts app.
iPhone/iPad
CalDAV
- Go to “Settings” > “Calendar” > “Accounts” > “Add Account” > “Other” > “Add CalDAV Account.”
- Enter the following details:
- Server: caldav.hostpoint.ch
- Username: The same e-mail address that you use to log into Cloud Office, e.g.This email address is being protected from spambots. You need JavaScript enabled to view it.
- Password: Your password
- Description: Give your CalDAV account any name you like to distinguish it from other calendars. - Click on “Next.”
→ The calendar is synchronized and can be viewed in the Calendar app.
CardDAV
- Go to “Settings” > “Contacts” > “Accounts” > “Add Account” > “Other” > “Add CardDAV Account.”
- Enter the following details:
- Server: carddav.hostpoint.ch
- Username: The same e-mail address that you use to log into Cloud Office, e.g.This email address is being protected from spambots. You need JavaScript enabled to view it.
- Password: Your password
- Description: Give your CardDAV account any name you like to distinguish it from other address books. - Click on “Next.”
→ The address book is synchronized and can be viewed in the Contacts app.
Android
For Android mobile devices, the Google Play Store offers various paid and free applications for CalDAV/CardDAV synchronization. The settings are always the same and are as follows:
CalDAV
- CalDAV URL/server address: https://caldav.hostpoint.ch/caldav/your calendar number
Note: The full server address and calendar number can be found in Cloud Office in the calendar properties: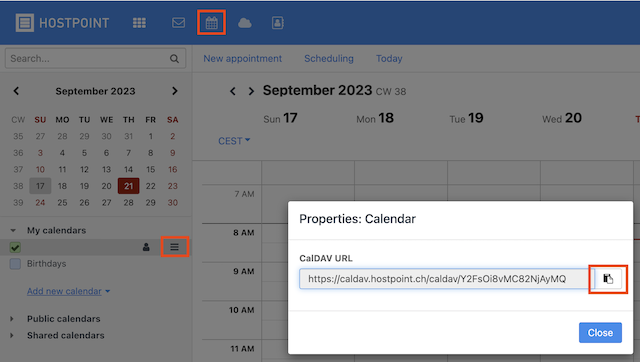
- Username: The same e-mail address that you use to log into Cloud Office, e.g.
This email address is being protected from spambots. You need JavaScript enabled to view it. - Password: Your password
- E-mail address: Your e-mail address
CardDAV
- CardDAV URL/server address: https://carddav.hostpoint.ch/carddav
- Username: The same e-mail address that you use to log into Cloud Office, e.g.
This email address is being protected from spambots. You need JavaScript enabled to view it. - Password: Your password
- E-mail address: Your e-mail address
Thunderbird
CalDAV
- Open the calendar in Thunderbird and click on “New Calendar” in the bottom left.
- Select “On the Network” and click “Next.”
- Enter your e-mail address in the “Username” field.
- Enter https://caldav.hostpoint.ch/caldav/your calendar number in the “Location” field and click on “Find Calendars.”

Note: The full server address and calendar number can be found in Cloud Office in the calendar properties: - Enter the password for your e-mail account and click on “OK.”
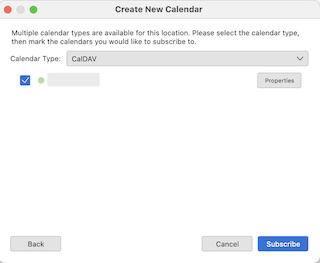
- For the calendar type, select “CalDAV” and click “Subscribe” below.
→ The calendar is synchronized and can be viewed in Thunderbird.
CardDAV
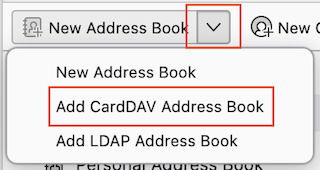
- Open the Address Book in Thunderbird and in the top left select “New Address Book” > “Add CardDAV Address Book.”
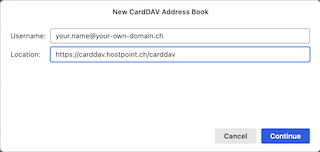
- Enter your e-mail address in the “Username” field.
- Under “Location,” enter https://carddav.hostpoint.ch/carddav and click “Continue.”
- Enter the password for your e-mail account and click on “OK.”
→ You will now see a list of all available address books. - Select the address books that you want to synchronize and click “Continue.”
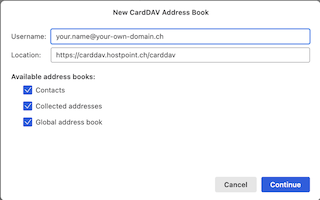
→ The address book is synchronized and can be viewed in Thunderbird.
Outlook
Outlook does not provide built-in support for CalDAV/CardDAV synchronization. To synchronize your calendars and contacts with Outlook, you need a plugin (CalDAV Synchronizer). The plugin can be downloaded here.
CalDAV
- Open Outlook, click on the “CalDAV Synchronizer” tab and then on “Synchronization profiles”.
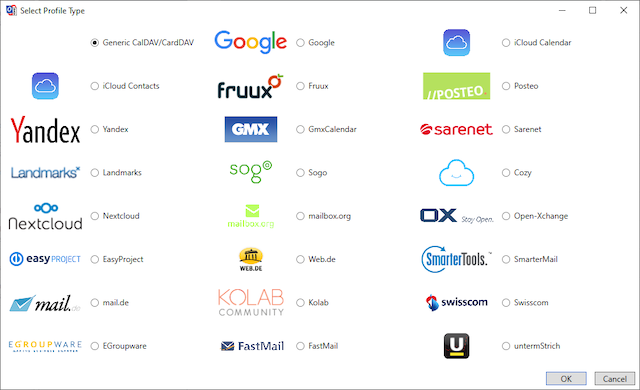
- Add a new “Generic CalDAV/CardDAV” profile and click “OK.”
- Give the profile a name.
- Select the folder in which you want to save the calendar and click “OK.”
- Enter the following server settings:
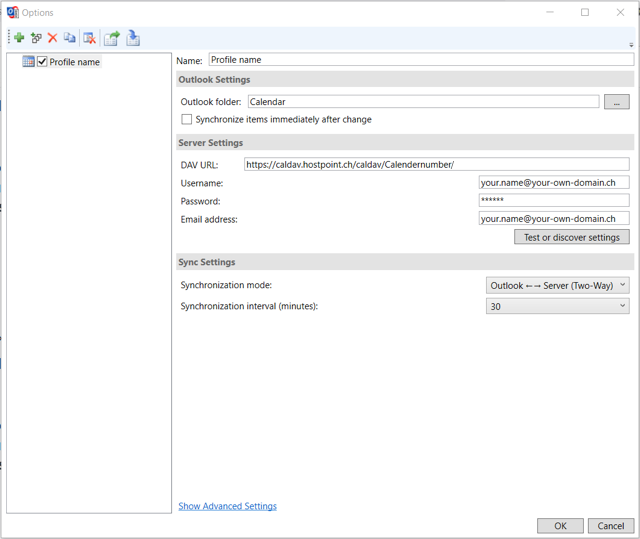
- DAV URL: https://caldav.hostpoint.ch/caldav/your calendar number/
Note: The full server address and calendar number can be found in Cloud Office in the calendar properties:
- Username: The same e-mail address that you use to log into Cloud Office, e.g.This email address is being protected from spambots. You need JavaScript enabled to view it.
- Password: Your password
- E-mail address: Your e-mail address - Click “OK.”
→ The calendar is synchronized and can be viewed in Outlook.
CardDAV
- Open Outlook, click on the “CalDAV Synchronizer” tab and then on “Synchronization profiles”.
- Add a new “Generic CalDAV/CardDAV” profile and click “OK.”
- Give the profile a name.
- Select the folder in which you want to save the contacts and click “OK.”
- Enter the following server settings:
- DAV URL: https://carddav.hostpoint.ch/carddav/address book ID/
Note: You can find the address book ID in Cloud Office. Open the corresponding address book and copy the number after “folder=con://0/” in the URL.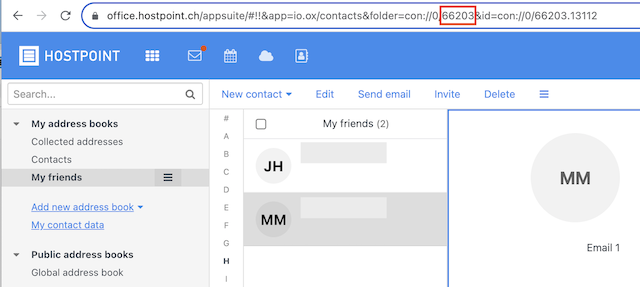
- Username: The same e-mail address that you use to log into Cloud Office, e.g.This email address is being protected from spambots. You need JavaScript enabled to view it.
- Password: Your password
- E-mail address: Your e-mail address - Click “OK.”
→ The address book is synchronized and can be viewed in Outlook.
For support requests please use this form instead.