



Would you like your website to always be accessed in encrypted form via HTTPS? Then you need to set up a redirect from HTTP to HTTPS. You can find out how to do this in this article.
What is HTTPS?
HTTPS stands for “Hypertext Transfer Protocol Secure”. In contrast to HTTP, HTTPS uses an encryption protocol called SSL (short for “Secure Sockets Layer”). This protocol ensures that the data between the browser and the web server is encrypted. For this encryption to work, the website requires an SSL certificate, which is installed on the web hosting server.
However, the data is only transmitted in encrypted form if the website is accessed via HTTPS (instead of HTTP). To enforce this, you must set up a redirect.
How do I set up a redirect?
The following options are available for setting up a redirect:
- If you use a CMS, it is best to set up the redirect directly in the respective system. To do this, follow our instructions for the most common systems (WordPress, TYPO3, Drupal, Joomla!) or consult the documentation for your CMS.
- If you do not use a CMS, you can also set up the redirect directly in the Hostpoint Control Panel. To do this, follow the instructions below.
Set up redirection in the Hostpoint Control Panel
- Log in to the Hostpoint Control Panel with your Hostpoint ID.
- Open the web hosting on which you manage the affected website.
- Click on “Websites“ in the menu on the left.
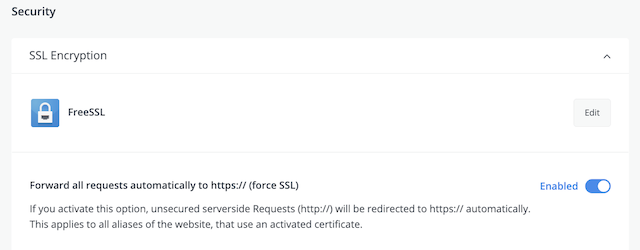
- Click on “Edit“ for the website you want to modify and scroll down to the “SSL Encryption“ section.
- Enable the option “Forward all requests automatically to https:// (force SSL)“.
- Save your changes.
→ The redirect has been set up. All requests to your website will now be automatically redirected to HTTPS.

For support requests please use this form instead.

